
On this page
Most Kubernetes tutorials stop at getting your app accessible over HTTP. In practice, TLS is not optional. This walkthrough takes you through the full setup: deploying applications, wiring up ClusterIP services, installing Contour as the Ingress controller, generating a self-signed TLS certificate, and validating that HTTPS traffic is routing correctly across your pods.
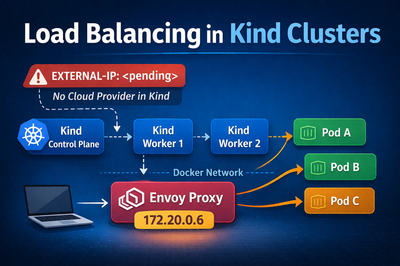
Everything here runs on a local Kind cluster with cloud-provider-kind handling the LoadBalancer provisioning.
What is an Ingress and Why Does It Matter
When you expose an application in Kubernetes, the straightforward path is a Service of type LoadBalancer or NodePort. That works, but it gives you one external IP per Service. In a real environment with tens or hundreds of services, that gets out of hand fast. You end up with a pile of external IPs, no centralised TLS termination, and no clean way to route based on hostname or URL path.
An Ingress solves this. It is a Kubernetes resource that defines HTTP and HTTPS routing rules for external traffic entering the cluster. A single Ingress can route alpaca.example.com to one Service and bandicoot.example.com to another, all through a single external IP. It also handles TLS termination, so your backend Services never need to deal with certificates at all.
The Ingress resource itself is just a set of rules sitting in etcd. Something still has to read those rules and act on them. That is the job of the Ingress controller.
What is an Ingress Controller
An Ingress controller is a component running inside the cluster that watches for Ingress resources and configures a proxy to enforce the routing rules they define. Kubernetes does not ship with one by default, so you have to install it separately. There are several options to choose from including nginx-ingress, HAProxy, Traefik, and Contour.